For project and resource planning, Views can be a powerful tool. Acting as “snapshots” of the bigger picture, they can help you discover a different side and story to your projects and resources. Learn all about Ganttic’s Views and how they can help you get the most out of your planning.
Project Resource Planning Your Way
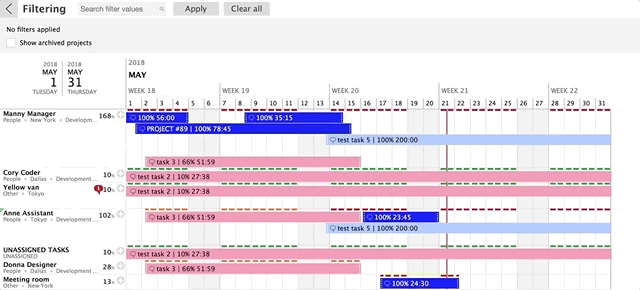
Planning resources with Ganttic should start with thinking about what you need to see. Is it the resource allocation of each department of your organization? Is it the utilization of specific teams? Is it the allocation of engineers in different locations and the pieces of technology they use? Is it all the different projects and portfolios? Or is it something else?
The key to achieving these goals is adding your data to Ganttic via custom data fields.
The planner’s capabilities increase with every custom data field you add. After you have added list-type data fields to resources, you can group them. Making it easier to find resources with the right skillset for your projects. After you have added user-type data fields to projects, you can filter projects by the project manager assigned to them. After you have added numeric data, you can use calculations in reports.
But what happens when you have all this info? Create a new View, that’s what!
What are Views in Ganttic?
Ganttic views are snippets or “snapshots” of your general resource plan. Views are a way to divide a complicated schedule into more manageable bits. Examples are Views for each department, location, team, skill group, etc. You create Views that are private and which only you can see. Or you can assign Views to other users.
Or do both! The best part is you don’t have to choose if you want one thing or another. You can have it all by creating views with different settings. Plus, since the number of Views you create in your planner are unlimited, there’s no need to be shy.
 Create Views with different color coding options for new insights on your data.
With Views you can:
- Filter extraneous data out for better decision making
- Simplify complex plans
- Create different Views for specific people, projects, or departments
- Color code plans according to different criteria
Types of Views in Ganttic
General resource view
General resource view is where it all begins. It’s a view without any grouping, filters or coloring. Just a plain view of how things are.
A view of how things are does kind of sounds good, doesn’t it? Why should you change anything? Creating different views will allow you to do more thorough resource planning. You can only view the details or the big picture. You’ll actually get a control over what’s going on. The need to use different views grows as the number of resources you have grow.
Custom views
Custom views are modifications of the general resource view. How to do those modifications and how to use them to your advantage is what this article is about.
Projects views
Project views are custom views with a hint of general resource view.
If you plan a task in a project view, it will be automatically connected to that project. The tasks that have been allocated to the resource but are part of another project, are grayed out. The default coloring is by project colors and the default time period is the duration of the project.
You can modify all of the view settings. The only thing is, you can’t save different versions of the project view. You can have different settings for each individual project but you can’t create different versions of one project.
List of views
The list of views is the list of views you have created. You can access it through the sidebar. You can add new views from there, you can open views up and you can delete views you have created.
Using Views in Ganttic
Each view in Ganttic now has customizable visibility settings in addition to all the grouping, sorting, filtering, etc options. You can decide what Ganttic will and won’t display for every view you have created. Some settings – Utilization and Dependencies – can be turned on and off from General Settings. If these settings are turned off, they cannot be turned on for a specific View.
The visibility settings are available for both resource and project views.
You can choose from the following settings:
- which chart row height is used for the view,
- if Ganttic displays the tasks of archived projects,
- if Ganttic displays the tasks that are not assigned to resources,
- how Ganttic displays the placeholders (the tasks which don’t meet the filter criteria of the View),
- if and how to display the resource availability;
- if or which resource utilization graphs are displayed.
Placeholders are the tasks that are not meeting the filter criteria. For example, if you open a project in a single project view and the placeholders are enabled, you can see if the resources are allocated to other projects in the same timeframe. Placeholders are displayed as grayed out taskbars with or without taskbar information.
How Do Views Benefit You?
Only the Essentials
Ganttic’s View feature comes with several benefits. Firstly, it gives you more options to choose from. Helping you to not only get more creative in your planning, but providing you with and unlimited array of ways to test out project planning workflow.
Let’s take dependencies as an example. Dependencies work well in a project setting. If there aren’t too many resources involved, you can easily see which tasks are dependent on each other. However, if you want to see the big picture, dependencies may be nothing but noise. For clients or stakeholders, they make the information more difficult to comprehend and add clutter to the planner.
Counteract that by only enabling dependencies for Views where they make sense (single project views, smaller team views, etc). And disable them for the Views where they are in the way (general resource views, views for departments, etc).
Perfect for Large Teams
Views are also handy when you want to par down on your options. If you’re resource planning with hundreds or even thousands of resources, you need to get specific to do it right. By creating Views of only certain branches or departments, you can hone in on the right workforce from the get-go. Eliminating the risk of accidentally scheduling someone for a job in Bangkok when they’re located in London.
Furthermore, shareable Views can be built and specially customized with specific users in mind. For example, if you are working with freelancers, create a View where you only display the tasks that they need to see, hiding all the others. Make it easier on them by excluding all the information that’s not necessary for them to complete their assignments.
Are You Even Tracking Resource Utilization?
Resource capacity utilization is a great thing if you are using it. However, if you are not using it, it’s just an abstract percentage. For those of you that deal with projects, clients, and project portfolios, available time and busy time might be easier to comprehend. Even more so considering Ganttic is keeping track of the over hours.
If you are still not convinced, there’s also an option to hide any utilization related percentages, graphs, and numbers altogether.
Smoother Experience
Another bonus of more powerful views is the fact that if there are some views, where you don’t want any of the bells and whistles, you can turn them off. You can get the kind of overview you need, the planner may load faster, and the overall experience will be smoother.
That’s the beauty of Ganttic. It’s the resource planning tool you need it to be.
Creating a Custom View
To create a custom view, you can open up any of the views that you already have or select ‘ADD NEW’ from the list of views.
The easiest example is a view for a department. Start by filtering out the department.
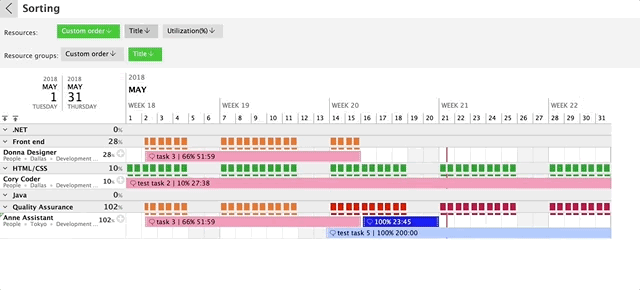
Then, let’s say you want the resources to be grouped by their skills and you have a list type custom data field with the information. Select the grouping.

Let’s say you want the resources to be sorted in those groups in the way that the resources with the biggest utilization percentage would be at the bottom of the group. Go to sorting, select utilization, and make sure that the arrow is pointing down.
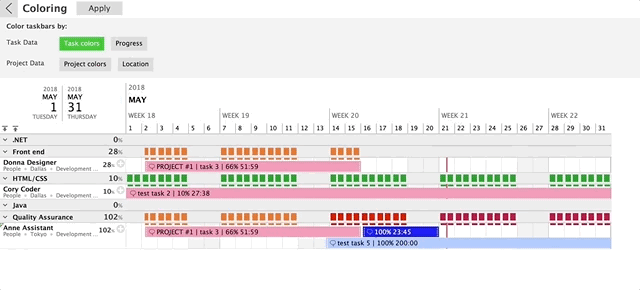
You might want the Gantt charts to be colored by project colors so that you’d know which projects your department is working on. Select coloring, and project colors. Click on ‘Apply’.
The last thing is the time period. You can create a custom time period that fits your planning needs or choose one from the list.
As you can see, the schedule looks quite different from the general resource view. That’s because you have created a custom view. All that is left to do is to save it!
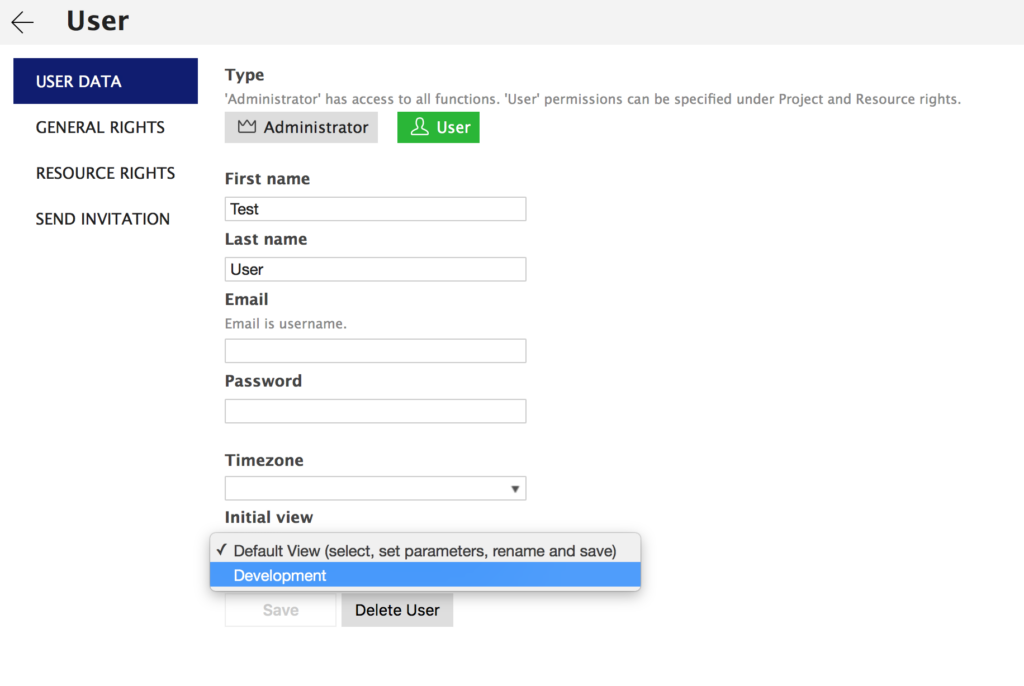
Set as a default view
If you are just starting off with your Ganttic journey, you might find it helpful to know that you can set a default view for a user. For example, if you are adding someone that is a part of the department you created a view for, you can set the view as their default view and they’ll see it as they log in.
Public vs private
Another thing about the views is that you can create views that are meant for your eyes only and views that the whole team can see (that’s when you’re an administrator).
Everyone can create private views. For example, if someone on your team just wants to know their own tasks and maybe the tasks of Leonard and Katherine, they can filter these resources out and save the view with the filters.
Or maybe you want a view with different coloring through some custom data field that is only relevant to you. Since changing the coloring can be somewhat confusing to the team, you can create a private view. If you are an administrator, you just need to make sure you have selected ‘Only me’ as the access setting.
Public views are visible to everyone. If you create a public view, it will appear in the list of views of every user and administrator. They can open it. They can use it. Administrators can also edit the settings of any public view, users can’t.
You can create specific views for departments, for teams, for locations etc. If your whole organization is using Ganttic as their resource planning software, these kinds of views are essential since they divide the general resource plan into manageable bits. And there’s always the option to go back to general resource view to see how things go together.
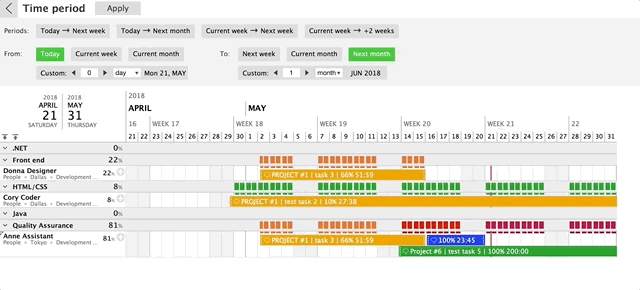
Today and the future: Setting Time Periods
Selecting a time period for a view can be somewhat tricky. When planning resources for multiple projects, it’s important to know the short-term as well as the long-term workload of your staff. You also need to know when the machinery is being used and when it’s free. You also need to know when the rooms are booked etc.
The time period of the view is the last setting that you can choose for a view. If you want to create a view with a specific time period select that time period, choose the other settings that you’d like to be applied to the view. Go back to ‘View’ and select ‘Save as’ and you’ll have a new view that you can give a name to.
Having an overview of what’s going on in the short-term is important for your team as well as for you as a team leader. It’s about optimizing and reallocating. It’s about changing the task statuses and seeing what’s next on the schedule. Short-term views are what your team should keep their eyes on. Visual long-term plans are good for sales and forecasting. It isn’t about the now, it’s about the future. It’s just booking and making sure you have enough resources. It’s the view that’s a good fit for the upper management.
Three Most Popular Views
Our recommendation here is to create three general resource views with different time periods. One that shows you the schedule for this week and the next week. One that shows you the schedule from today and ends with the next month. And the last one should be even longer than that depending on how plans are made in your organization.
The first two are the most popular options among our clients. Using both of them will give you a manageable picture of what’s going on. You’ll know what’s going on in the near future. You’ll know if you can take on new projects. You can reallocate resources and fix problems before you actually encounter them.
The third and the longest time period gives you that extra oomph as a project manager. It definitely isn’t about the details. Group your resources using the projects that their tasks are a part of and turn the utilization graphs on. That way you’ll kn
Views give project managers a new way to play with their data. Leading the way for stronger insights and more powerful project plans. Questions about using Views for your own planning needs? Contact us for a free demo and walkthrough. We’ll show you how to turn better plans into better results.