Although we see resource planning in project management as something that calls for a lot of attention and human touch, sometimes, it can also get quite repetitive. We are going to paint a picture by referring to some of the stories of our clients.
Let’s say you have a few types of projects that have their own structure, however, the same type of projects always have the same set of tasks and phases. That’s when you wish that you could create a template project of the tasks you use for each of the projects (with or without resources), and save it. Then, when you take on a project – and you know it’s a certain type of a project – you could create a project from the template. Give it a name and get to (re)allocating.
Without the template – however – you have to manually create the project schedule from the scratch. And when the same type of project is taken on again, you’ll have to start from the beginning. Have you ever felt that kind of pain? If you have, we have good news for you. Ganttic has an easy way to schedule projects.
Project Templates in Ganttic
As always, we have kept the basics quite simple. You can either create a template from an existing project or from scratch. The first might be easier to get started because you don’t have to think about hypothetical dates for milestones. However, we are going to go over both of the options (and then some).
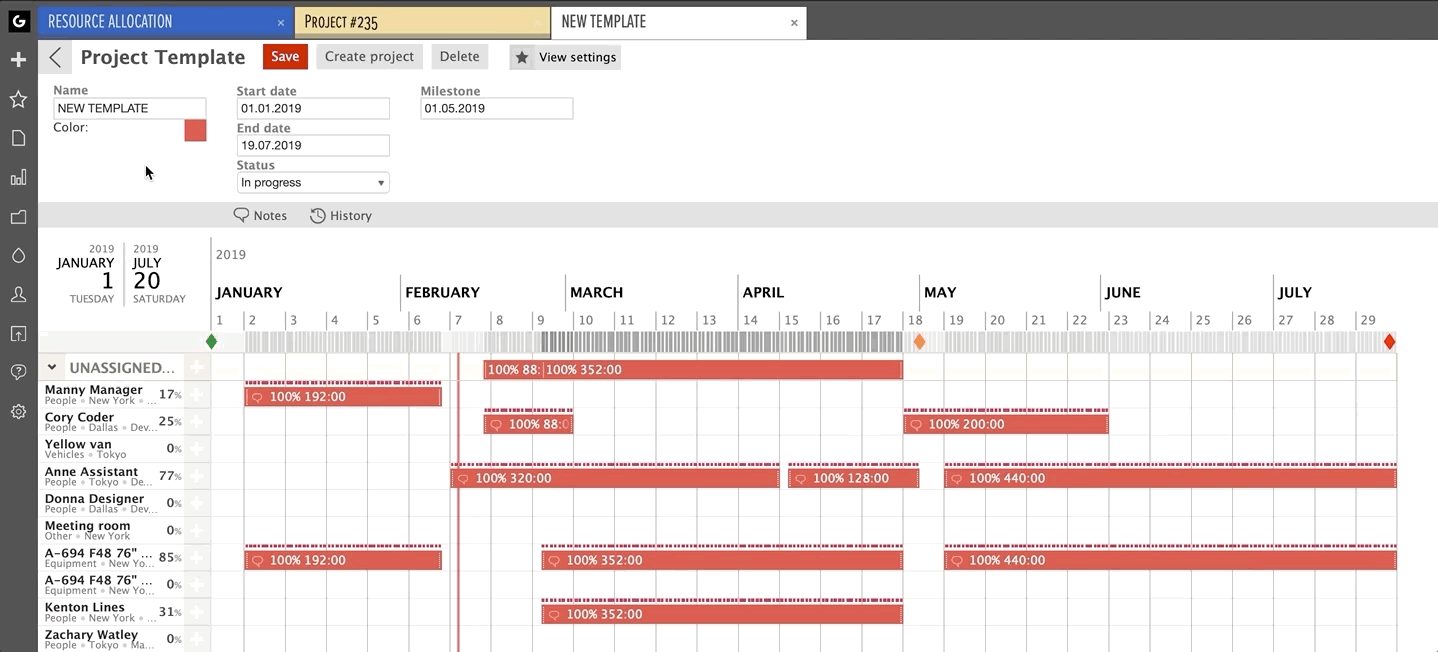
All project templates you create appear under templates tag in the list of projects. Any of the aspects of the template can be changed when opening the template. Or when making a project out of it (including milestones, colors, etc).
When opening a project template, it will be displayed as a gray tab – this is how you can differentiate it from your projects. If you are using gray as a project color, be careful here. However, if you do happen to make all the changes to your template instead of a project, you can create a project from the template and all your hard work won’t be for anything.
And that’s about it about the basics. Now, let’s get to the three ways you can approach creating templates.
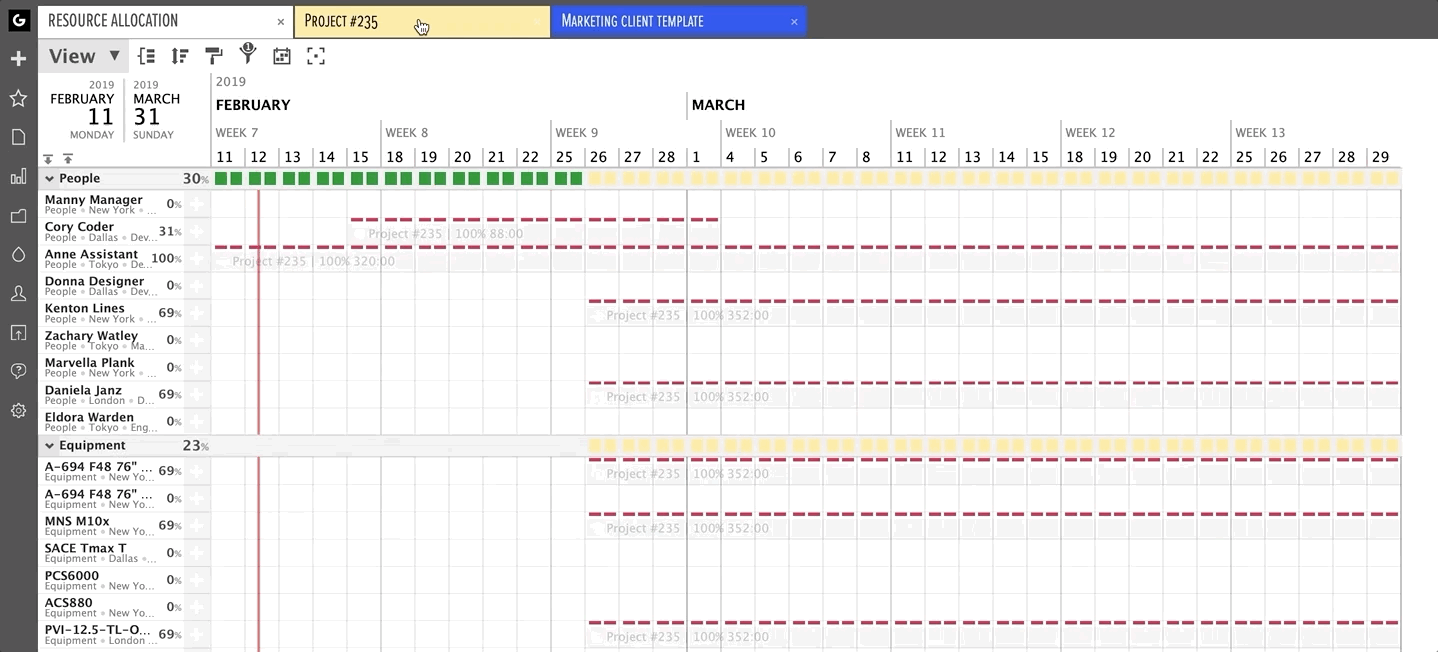
Create project templates from existing projects
As said before, this might be the easiest way to test the feature out because you already have thought the project through and know how it lays out on the timeline.
Open the project in a single project view and click on the project to display the project dialog. There you can select ‘Create template’. Once you have done that, the template is created and will pop up. Give it a new name so you can differentiate it from the original project.
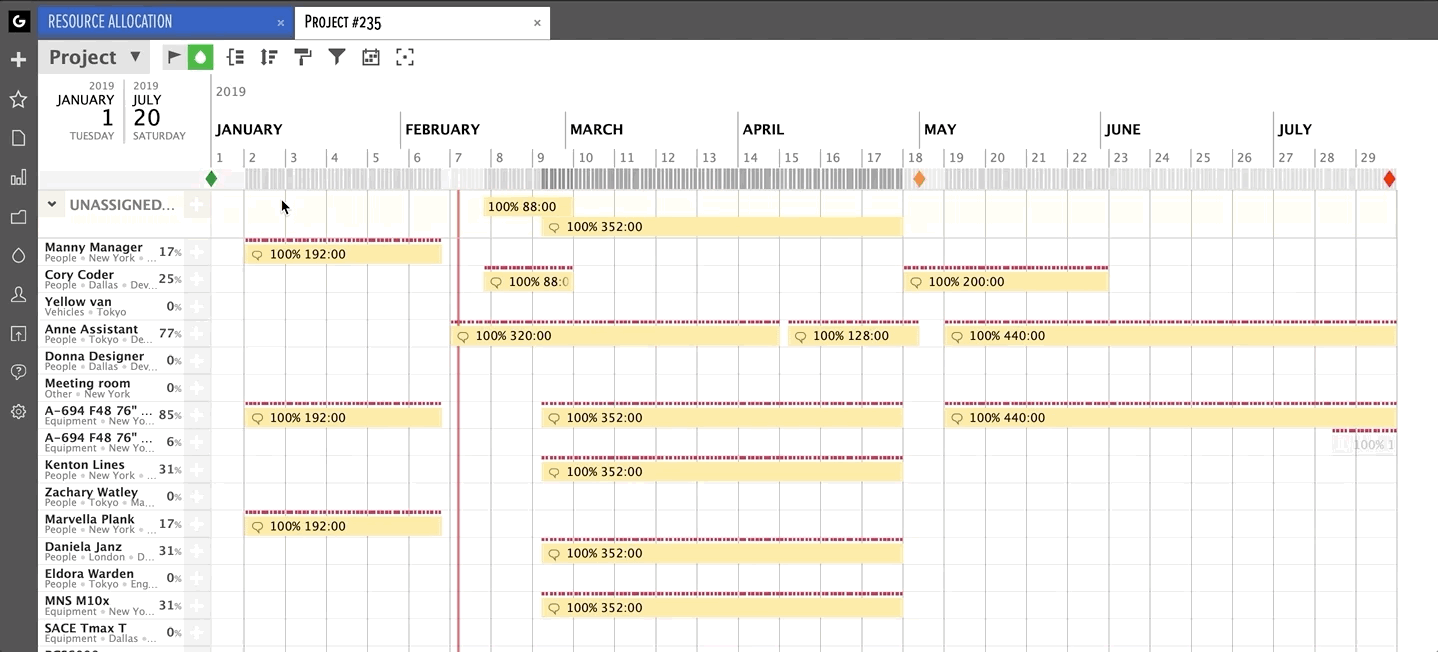
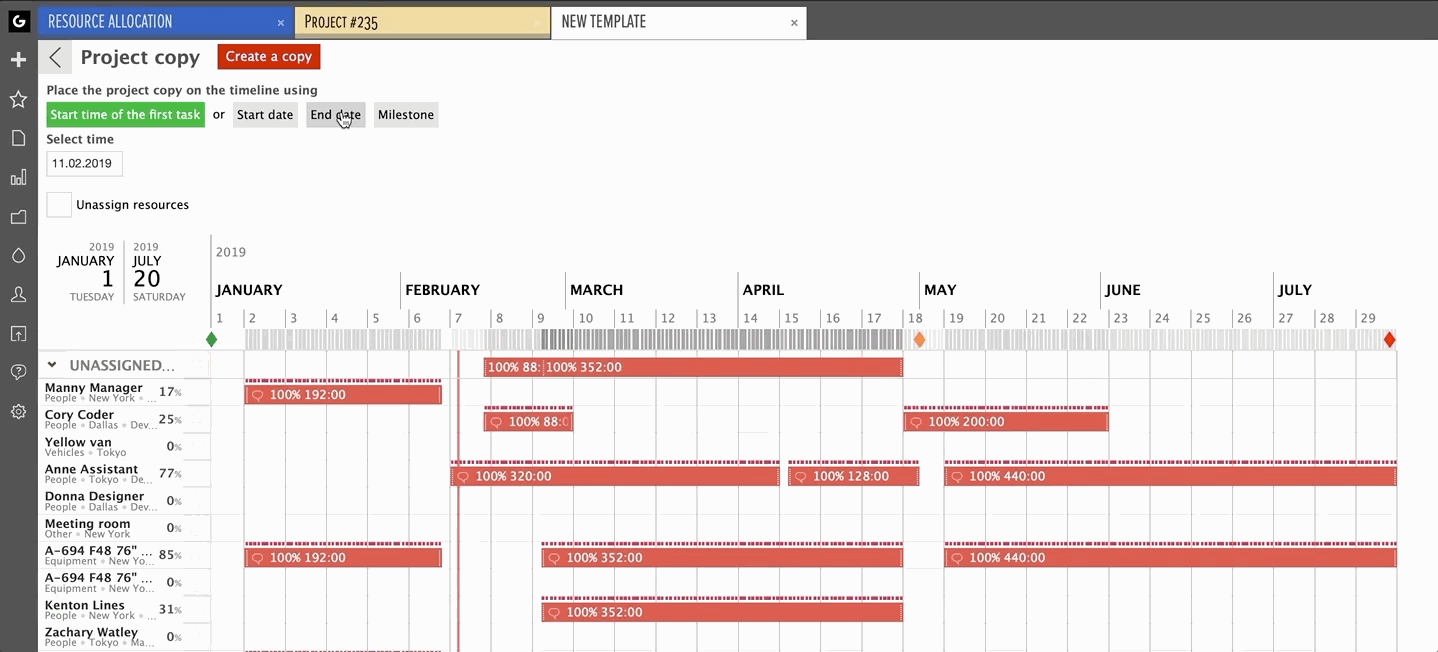
If you want to see how it translates into a new project, click on ‘Create project’. You can choose where the project will be placed on the timeline. To choose the right anchor or an offset, you need to think about your project as an element you are shifting on the timeline depending on the date you choose.
The first is the start time of the first task connected to the project (not in the sense of the first task created but the task that starts the earliest on the timeline). If you choose this option, all the following tasks and milestones will be moved accordingly. The time periods between the tasks and between the milestones will remain unchanged, but the dates will be updated.
If you choose a milestone you have set, the project will be placed using that milestone. If the milestone is the start time of the project, it will probably look similar to the start time of the first task since these dates are usually the same.
However, if you are using any other milestone, the placing will look a bit different. Let’s say you want to place the project using a milestone that marks the date you have a status meeting with the client. There are tasks in the project before and after this milestone.
The date you’ll choose for this milestone will be used to anchor the project and to calculate all the other milestones and task start times. For example, you can see when the project should start for it to reach the milestone on the selected date.
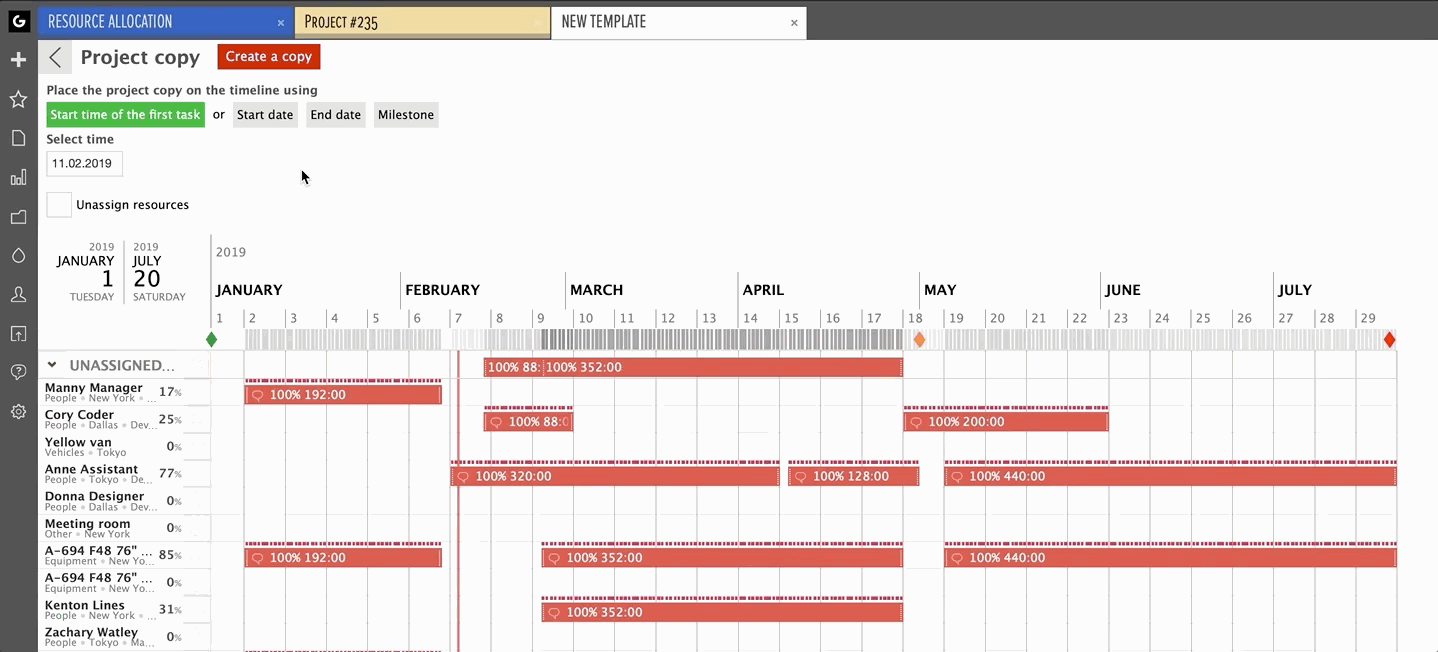
Next, you can choose to unassign the resources or you can leave that box unchecked. If you didn’t know – you can also schedule tasks without assigning the resources in a single project view.
If you choose to unassign the resources, the tasks will be displayed in the ‘UNASSIGNED’ row. The timing will remain unchanged and you can either drag and drop them to allocate resources or use the ‘+’ that appears next to resource titles once you open the task dialog.
Whatever you choose, you’ll have just one step left – to create the project from the template. Once you click the ‘Create project’ button, the new project will pop up in a new Ganttic tab and you can start with the resource management and making the necessary changes to the schedule.
Create a new project template
If you want to create the templates from scratch, you need to start from the projects’ list and open up the templates.
The templates list works the same way as the project list. If you click the ‘Add new’ button, you can give the template a name, and fill in the custom data fields. When filling in the date type of custom data fields, make sure you are thinking about the time intervals rather than the actual dates. Since the milestones are calculated using the anchor date you set, the actual dates will change, but the intervals will remain the same.
Once you are done with the data fields, you can open the template in a tab and start scheduling the tasks. Again – you can choose if you want to allocate the tasks to resources right away or if you just want to build the structure by creating the tasks and allocating the resources once you are actually scheduling a specific project.
All the tasks you add will be connected to that template automatically. However, if you change the custom data fields, view settings, etc make sure you are clicking save in the project dialog.
Creating projects from that template works the same way as creating projects from a template that was created using an exciting project.
Create a copy of a project
If you are not looking to create a template that you can use time after time again, you can also create a one time copy of a project.
All the options are the same as with creating a template from a project. The only difference is you need to choose ‘Copy project’ instead of ‘Save as template’ in the project dialog, and the project won’t be saved as a template in the project list.
Things to look out for
Features that make planning quick and painless have a tendency to create miscommunications since it can be easy to overlook mistakes. To ensure everything will run smoothly with the new project make sure to:
- Check resource utilization. When assigning tasks automatically, it can happen that the resource is already booked and the new tasks will be added as a concurrent task even if the resources’ optimal capacity is already reached. Reallocate resources or modify the task timing accordingly.’
- Check the milestones. Since milestones are calculated using the date you choose for an anchor, have a look at the new dates and modify where needed. Make sure the tasks and the corresponding project phases actually fit the dates of the milestones. Make sure that the last task of the project will end when the project has to be completed.
- Allocate resources. Yes, really. Checking or not checking a box is a tiny step that can easily be overlooked and you can end up in a situation where you are presenting a schedule in a meeting and no tasks are assigned. Double check. Open the project, click around on the timeline.
More Efficient Project Scheduling and Planning with Templates
However you prefer create your project schedule, Ganttic’s project templates have make the whole process quick and easy. See a few more tips on project scheduling techniques. Or book a free demo with us. We’ll find a workflow that fits you.