We are happy to introduce you to our “Task split” feature. See how this little change can help with your project management and scheduling run more smoothly. We will also go through some of the best task scheduling practices, which is a great place to try out this feature.
Ganttic Feature: Task Splitting
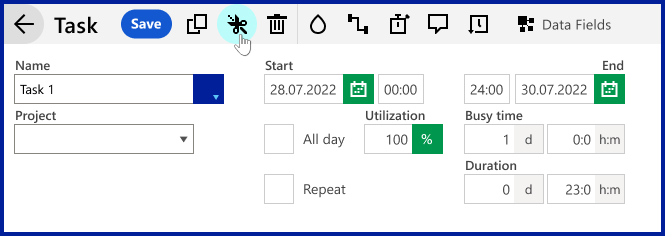
With the latest update, we gave the Task Edit Dialog a new look. What exactly changed?
- With our users in mind, we designed Ganttic to look clearer. Finally, the same visual logic utilized in Resources and Projects is now used in the Task Edit Dialog.
- Now, all the essential resource planning features are displayed as a toolbar. That way you can find all the necessary task features in one convenient spot.
- We’ve introduced a brand new feature: Task Splitting. This is something you’ve been asking for to help with your planning. And we’ve delivered!
- Additionally, we’ve polished up our Task Timing Settings. This means more precise and efficient planning for you.
How Task Split Helps with Planning
Our easy drag and drop capabilities makes general planning convenient. Just pick the resources and suitable time slots and drop the lines. But projects are agile. Real-time project scheduling often encounters different challenges, especially unexpected ones. Changes, additions, wrong timings, and lack of resources are just a few you might experience.
Maybe you have an urgent, new task to fit in the project between other tasks;
OR
Maybe a task ended up being too complex for one person to handle;
OR
Maybe you decide one big task should be divided into smaller ones in order to finish it on time.
Task Splitting works in all those cases. And makes problems easier to handle. There is no need to:
- make extra tasks and reschedule old ones, just split the big task;
- change the durations, you can split the task with 15-minute punctuality;
- deal with rescheduling old tasks and fitting in new ones;
- stress! Everything is under control!
How To Split Tasks In Ganttic
There are tons of instances when task splitting will come in handy. Saving you time and reducing unneeded stress. Even better, Task Splitting in Ganttic has been made really easy:
- Click on the Task you need to split by opening the Task Edit Dialog.
- Choose the Split Task (represented by scissors) in the Task Edit Dialog toolbar.
- Choose the date and time (if you’d like to specify) from when to split the task
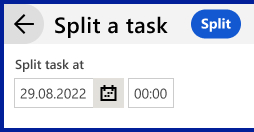
- Congratulations! You now have two tasks instead of one. Notice the split point which is marked with little cut dots. You can now drag and drop both tasks to assign them to different times and people.
You can easily add both tasks to different projects and use different color schemes. Both tasks will work as independent tasks from the time of splitting.

A Fresh Look For the Task Edit Dialog & Simpler Task Timing
On a daily basis, we collect feedback from our users. This helps us make our resource planner more convenient and intuitive to use. We’ve gotten quite a bit of feedback about the functionalities of the Task Edit Dialog. And we are happy to have made it even better and user friendly.
Selecting the best task timing option for you is now improved. Actually – you don’t even need to select timing anymore. Just enter the project timing data that you have and let Ganttic do the rest!
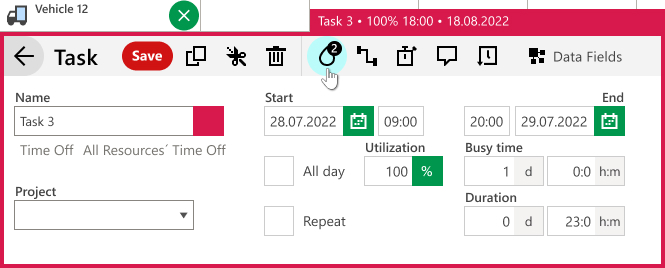
All the possible timing fields are shown in the Task Edit Dialog. The green ones are the ones that are selected as default settings, while the grey ones are calculated by Ganttic based on the info in the green fields. In case you would like to enter different data to the grey fields, just choose them and enter your info.
Ganttic Tips & Tricks: Terms In Ganttic For Task Scheduling
Here is the main scheduling terminology to help you use Ganttic better. Take a look. Are you getting the most out of Ganttic?
- Task Start time – date (& time) when your task starts. You can also choose “all-day tasks”
- Task End time – date (& time) when a task should be completed
- Task Duration – calendar time of how long it takes to finish the task. Task duration also includes holidays, absences, weekends, etc on time count if not set differently.
- Task Busy Time – actual working days and hours the resource or employee is working with the current task. Busy time is based on resource working time (length of the working day) settings and is automatically calculated excluding the time when the resource is not working its nights, holidays and absence charts.
For example, if the task starts on the 1st of January, takes 1 week, and the working days are 8h/day, the busy time is 40 hours. Task duration hereby is 1 week (7 days). Task Start time is 1.01 and Task End Time is 7.01.
- Utilization – shows the percentage (%) of talent skills “use,” machinery usage, etc. during that visible period. Maximum usage is always 100%. For better planning, you can also include part-time employees and see who is overburdened. Or vice versa – see who has plenty of free time.
How To Schedule Tasks More Easily From Now On
You can simply use the task scheduling data which is most convenient for you. Or using the information that you actually have. Fill in the Task Timing gaps you have in mind –
 Ganttic’s task timing options, the green fields are for manual input.
green fields are for your data (manual input).
grey fields are Ganttic’s calculations based on your data.
For convenient usage, the default settings (fields that stay green by default) can be changed from the Ganttic Settings > Task Timing. Have a look and choose the timing preference you use the most.
From the user perspective, there is no need to think anymore if the right calculation and time count is switched on. Just fill in the info you have in the green slots and fill in other slots in case you have different info available.
Task Scheduling- Best Practices To Use In Ganttic
With the recently updated Task Edit Dialog, we’d also like to go through some easy basics of task scheduling. This is to make sure your scheduling is as efficient as possible. We’ll also try to share a few additional tips & tricks about convenient scheduling.
Have a look! Maybe you already follow all those practices. But perhaps there is something you can take from here. Go through these best practices and let us know in case you need some more information about anything else.
1. Drag And Drop – Quick And Easy Scheduling
Ganttic is a kind of drag and drop software. And drag and drop is the champion of task scheduling. It’s the easiest and fastest way for you to allocate resources to projects. Just drag… and drop the task in the timeline. It might even be THE best practice you try out to make your work easier!
If Drag and Drop is something you use on a daily scheduling basis, make sure you have Autosave switched on. Autosave automatically saves the tasks that are dragged and dropped and makes planning clearer and faster. Autosave does the saving for you and does not open the Task Edit Dialog for every Drag and Drop and task length change. You can still do more detailed changes just by clicking on a task to open the Task Edit Dialog. Try it out if you haven’t yet!
Just find the Autosave switch under Settings > Chart.
2. Task Data Field – Customize Info For Your Needs
Task Data Fields are useful for anybody who needs some extra info to define the task. You can add different details to the task so the assignments are clearer. With the help of Task Data Fields, you can actually add some extra descriptions, important phone numbers, or even a map to see the location of the task. It can be anything important for you to make your planning easier and more transparent. Task Data Fields are a bit like adding another column of info in MS Excel.
If you do not want to go into details and use Ganttic more for visual planning, you can use Task Data Fields Color Schemes. With Color Schemes you can easily add custom data for coloring and filtering. Hereby ensuring that you are using list data that can be filtered for your needs.
For example, use different colors to indicate your task status: planned, confirmed, in progress, finished. For better visuality, choose a color for each that works for you. Statuses are just one example of another customization option in Ganttic.
3. Color Schemes – For Visual Overview
One of Ganttic’s strengths is visuality. Colors can be added in any way that benefits you. Tasks, statuses, or any other means you wish. It can be work types, task importance or the place where the task is happening. One of the most common practices is Task status.
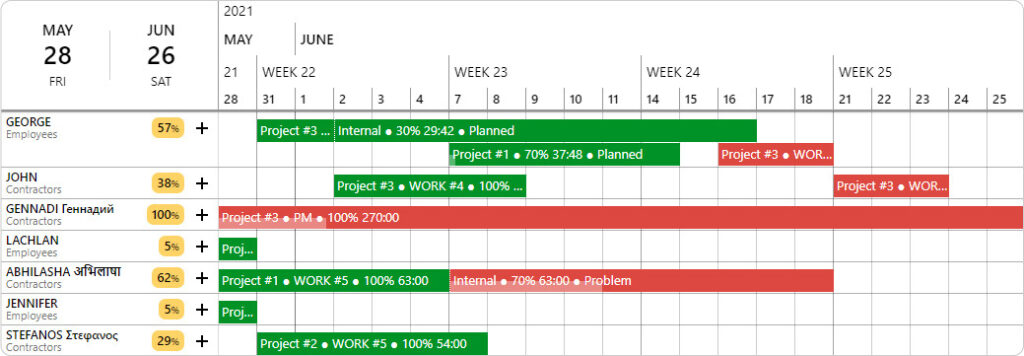
Color schemes make your planning visual and you are always able to select the schemes that are most suitable for your planning.
4. Advanced Timing – To Schedule With Control
Based on Ganttic statistics, the most common way for Ganttic users to schedule tasks is by using the start and the end date. For example, assigning a consultant to a company to perform an audit. You know when the contract starts, and you know when it should be done. Easy and clear!
But Start and End Date are not the only metrics that let us schedule tasks. In fact, according to our users, there are numerous scenarios where the start or end time is not even set. There are cases when you know the starting time and approximate hours of work (Busy time) to get the task done. In Ganttic, the planning is still easy! Just enter the info you know and let Ganttic do the rest of the calculations for you. It even shows you the right visual overview in the graph and all the info is in reports. Could it be any easier?
You can check out all the different ways to track and record time when you’re scheduling resources and projects.
In Ganttic you can play with different data, times and info to get scheduling done and keep control over your plans. Just fill in the info and let Ganttic do as much for you as possible. Control over your projects means less stress. Less stress means a happier life.
5. Assigning Tasks To Multiple Resources – For Smart Planning
It’s not rare for different people to be working on the same task. Or sometimes one task is also connected with other resources, like a meeting room, a yellow van or a special studio for recording.
To save tons of time and energy, you can actually assign one task to multiple resources at the same time. Just pick one and assign the task with all the information and details that are important for you in the Task Edit Dialog. Before closing the window, just mark another connected resource with the little “+” next to their name. This way you can assign the same task to multiple users at the same time.
There is even a special button on the Task Edit Dialog toolbar to tasks to manage all your shared Tasks.

Wrap it Up
Ganttic is project management software with Calendar Views, Task splitting, Gantt charts and more. If you enjoy new scheduling tips, follow our blog or look for us on Twitter or LinkedIn. In addition to task split, we have many more convenient ways of managing project Tasks and scheduling with precision.
In case of any questions contact our support for a free demo.
Sign yourself up for a demo! Had enough of the hassle in planning? Let’s make it a piece of cake!